Split Single Crochet Colorwork
Brenda K.B. AndersonWorking colorwork charts in crochet can be a fun way to turn your project up a notch. By using split single crochet stitches for colorwork, the result is crisp, clean stitches that really make your colorwork pop! In this video, crochet expert Brenda K.B. Anderson demonstrates how to work split single crochet for colorwork.
Brenda begins by reviewing the colorwork chart that will be used – a lemon slice motif. She notes that for the demonstration, she is only working part of the chart.
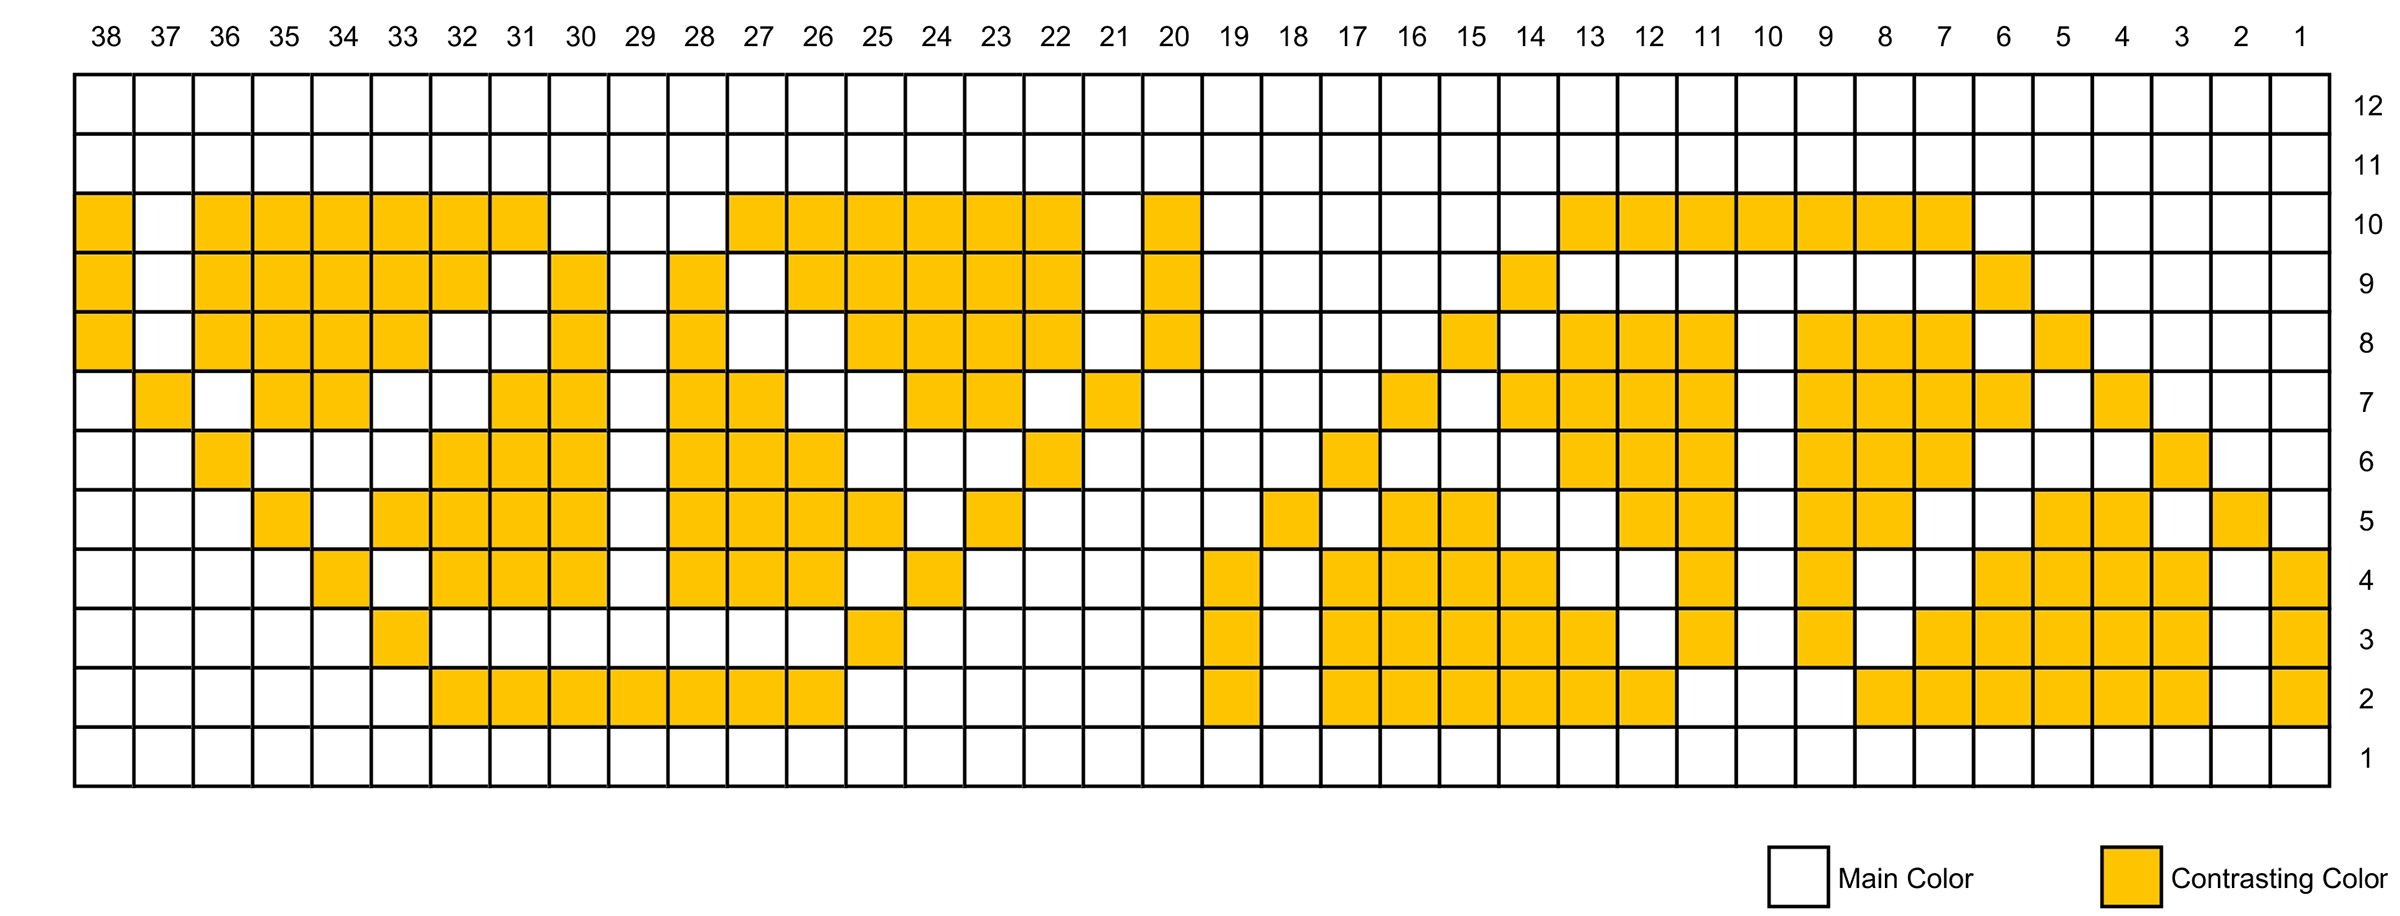
She chains 19 stitches for the chart, plus 6 stitches to serve as edge stitches. She chains one more as a turning chain and then works a row of standard single crochet stitches into the back (or bottom bump) of the foundation chain. Once this row is complete, Brenda joins in the round. The piece is worked entirely in the round and then cut to lay flat.
Now that the piece is joined in the round, she works the next round of the chart, joining the contrasting color. Brenda explains how to carry the yarn along while working the chart, as well as where to place the hook when working split single crochet stitches. As the swatch is worked, she stops occasionally to adjust the fabric to maintain an even tension, without puckering.
Once the chart is complete, Brenda cuts along the edge stitches so that the swatch is flat. She noticed a mistake while stitching and demonstrates how to fix the mistake. Much like knitting, a duplicate “v” stitch is created with yarn and tapestry needle. It’s a quick and easy way to fix a mistake without ripping out the entire piece.
Share tips, start a discussion or ask other students a question. If you have a question for an expert, please click here.
Already a member?
3 Responses to “Split Single Crochet Colorwork”
Hi, I'm Brenda K.B. Anderson. Thank you for joining me. In this video, I'm going to teach you how to use split single crochet to work from a color chart. Here's an example of the fabric that results from working split single crochet.
I'll turn it this way. You get all these nice little V's that stack up very neatly on top of each other, and it makes for nice clean color changes as well. So really this split single crochet stitch pattern is a really good one to use if you're working in color work. When you're working from a chart like this, you're gonna start at the bottom and you're gonna read the chart from right to left. And in this stitch pattern, you're going to be working in rounds, which means that you're never gonna turn your work and work across the opposite way.
You're always gonna be working with the right side facing. So you'll start round number one here, work across that, and then you'll do round number two, work across that. You're always going to be working in the same direction. If you are left-handed and you're working from a color chart, you can simply just work in this direction instead. So you don't have to worry about mirroring the chart for this particular stitch pattern.
So let's get started. First, I'm going to make a crochet chain, and in this chart, we're actually only gonna be working half of the chart. This is what the whole chart looks like. You can see here, we have upside down lemon, right side up lemon. So that's what you would see here, and then you would keep repeating that.
But we're just gonna work a smaller sample, and we're just gonna do this lemon. So we're going to chain 19 stitches because there's 19 stitches across our chart, and then we're gonna add a few extra stitches that we're going to end up cutting through later so that I can open up the stitch pattern and show you what it looks like flat. One, two, three, four, five, six, seven, eight, nine, 10, 11, 12, 13, 14, 15, 16, 17, 18, 19. And we're gonna add three stitches for each end, so that's six, one, two, three, four, five, six. Those stitches, they're not on the chart, I'm just going to add them.
They're just gonna be worked in the white, the main color. And then we're gonna add one turning chain. If you prefer to just begin working in the round, you don't need that turning chain, and you can just start working by working into your first chain. I like to work across the chain into the bottom of the chain, which means this little bump here on the bottom instead of on the top. Where you normally work under that V, I flip the chain over and I just begin working on the bottom.
It's a little easier for me to get my hook into it, and also the other added bonus is the edge of your work looks just like the last row that you do. It has all those nice, neat little V's on it, which I like, so. We're gonna skip over that first chain because that's my turning chain, and we're gonna begin working across the row, and we're working in all white, and we're not gonna add the second color until the next round. So these are just normal, single crochet stitches. You don't have to do the split 'cause there's nothing to split into.
I'll show you that on the next row. You're just gonna work regular single crochet stitches all the way across. And try to work these stitches or this pattern in general just a little looser than you normally do, unless you usually have a pretty loose tension. It will really help you on following rounds. This round, it doesn't really matter so much, but on the next round, because of where you insert your hook, it's gonna be really helpful if you have worked your stitches just a little looser than you normally do.
So now that we have worked across the row, we're going to join and start working in the round. We actually aren't going to do a slip stitch joint, we're just going to begin stitching into our previous stitches. So you can see I'm arranging here, this is the contrast color, and we're gonna lay it down right on the top edge of the main color, and we're gonna be working over that. Every time that you are working one color, the other color will be laying on top of it and you'll be working over it. So we're going to insert our hook here, and to do a split single crochet, you're going to insert your hook right there in the stitch.
Here, I'll show you one that's not so close to the end. There's a little V here on the front of the stitch, and you're putting your hook right in the middle of that. You're not gonna put it over here underneath these two, you're putting it in through the middle of the post. And see, since that's on top, it's gonna get trapped in there, so we have, oops, we're doing our three split single crochets at the beginning that aren't on the chart. So those are the split singles that are not on the chart, and then we're gonna begin working the chart on row, round number two, which begins with the contrasting color.
So we're gonna hold back on the last yarn over, and we're gonna yarn over with the contrast color here to change color. So again, we're gonna do a split single crochet going in between those two lines in the middle of that V, and we're only doing one stitch in this color, so we're gonna drop the yarn, and do the last yarn over with the next color. Same thing on this stitch, we're only doing one stitch, so we'll insert our hook, pull up a loop, drop the color, pull up the next color. And we're gonna do six of these in a row, one, two, three, four, five, six. And then I'll pull back on the last yarn over, and we're gonna do three of the main color right in the middle of that.
And every once in awhile, you're going to, when you switch back and forth, you wanna check the back of your work. Now, you can see there's all these little bits sticking up. If you pull on this, you should be able to get those back under control. So you wanna pull on this in order to make them tight, but then you can kind of pull on your fabric a little just to make sure that you didn't tighten it too much and you're not actually constricting your work, because you don't want it to start puckering. So we'll do three more split single crochets right here, one, two, three, and on the last, we're gonna hold back on that last yarn over, yarn over with the contrast color.
And since we just switched, we'll tug on that a little bit to tighten it up, pull on this to make sure it's not too tight, and then we're gonna do six in this color. And hold back on that yarn over, switch to the next color. And we're gonna pull up before I go in there. Once I've switched to the new color, we're gonna pull on that. And we're gonna pull on that just to make sure.
And since there's just one of those stitches, so we're gonna hold back and switch, and switch again. And we'll do our last three split single crochets at the end, and now we're gonna continue on the next round. We're gonna be working on round three. Whenever I use these little chart keepers, or if I don't have a chart keeper, I'll put post-it notes or a piece of paper up above the round that I'm working on so that I can't see that next round so it doesn't confuse me. I would like to see where I've been so I can see how my stitches relate to the stitches that are already there.
So you don't wanna, ever wanna put it below. You wanna put it above, 'cause you don't need to know what comes next yet. All right, so we're gonna start out with our three split single crochets, one, two, three. And again, the first stitch is with the contrast color. And we're gonna switch back and forth a couple of times here.
And now we're going to, whenever I'm working from a chart, I look at how my stitches are gonna relate to the previous round. So when I look here, I can see I can stitch all the way across, except for in that last stitch. So that helps me instead of, I mean, you can also count, you can go one, two, three, four, five, okay, I'll do five stitches of that and then switch. But sometimes while I'm crocheting, I forget the numbers and then I get mixed up. So it's, for me, it's easier to have a visual cue of when I need to stop and change colors.
So here I am the end of that section, and there's one more left after this one so I'm going to change to white. And we're gonna change back and forth a few times. Okay, and after I've switched back and forth for all those little color changes, I'm going to work the following five to where that section of orange ends, and then switch to white. Whoops, that's not right. I need to do one more orange before I switch.
So when this starts to happen, when you start getting twists in your yarn, you can untwist it. If you look at how the twist is made, if you were to take the white and wrap it this way around the orange, that would untwist it. So what we're going to do is every time we make a color change on the next row, I'm going to put the yarn down to the front, and that should untwist my yarn. Okay, so there I've just worked those six stitches across here. I'm going to put my yarn down to the front like this, and pick up this color, do a stitch, and down to the front, pick up this color, do a stitch.
I should move this so that we know where we're at here. Okay, down to the front, pick up the new color, complete the stitch. And this time we're gonna work across until one more orange stitch is left, and then we will switch to white. Down to the front. We'll do two whites and then switch back to yellow.
See how it's untwisting a little bit? Two whites, put the white down to the front and pick up the yellow. And the reason that that got all twisted was because I kept setting the yarn down to the back, down to the back, down to the back over and over, so that of course is gonna twist it. One way to keep it from twisting, if you can remember to do this while you stitch is, if you always put the darker color to the back and the lighter color to the front every time you set it down, it'll keep it from twisting, or vice versa. It doesn't matter which color you put where, but you just need to decide at the beginning, which, if the darker color is gonna go to the front or the back, and if you stay consistent every time you switch colors, you're not gonna get all those twists in your yarn.
But it's hard to remember that. So I wanted to show you how to untwist it, because inevitably it will get twisted. So now you can see how these stitches are kind of lining up in those nice vertical rows and making those V-shaped stitches, and you're just gonna continue to work around and around and around, changing colors on the last yarn over before the color change, and then you'll have nice clean color work. So now we've worked all the way up to round 11. I've completed round 11 at the back of my work, and I am ready to cut this up and to show you what it looks like.
So I'll fasten off here, cut my yarn, fasten off. And as I was working this, I realized that I made a mistake in the color work, and I went back to fix it, but then I thought, why would I fix it when I can fix it on camera and actually show you how to fix it yourself? Because this is inevitably gonna happen, and it is so frustrating when you've done this whole beautiful color work, and then you realize that there's one little pixel that's wrong, or in my case, there's two that are wrong. So we'll cut this open and I'll show you what I'm talking about here. So there is our little orange slice, and you can see right here, the rind isn't really connecting here.
That's where the mistake was. I did one, two, three, and then instead, I should have done a white stitch here, but I did an orange stitch, and then this one should have been orange right there. So I'm gonna you how to fix those. So you can't really go back unless you rip everything out, but this is a pretty good way to hide your mistake. It's very, very similar to a duplicate stitch in knitting if you've ever seen that, but basically, you're just making a little V stitch right on top of the V that's already there.
So we're gonna start out with covering up this orange stitch. So I'm just gonna start my yarn back here somewhere, go through a few to kind of anchor it, and then I wanna come out at the bottom of the V, right there. This is the very bottom of the stitch that I wanna cover up. Then I'm going to slide my needle underneath these, stitch right above it and pull it. See, it's like a little eraser.
And then you can put your needle back down where you came from. And you know, maybe it isn't perfect, but really, it blends in really well. You can hardly tell that that's even there, and after blocking, I doubt anyone would be able to notice that. So I'm going to get rid of my arm back here. Normally you would weave it a few times, you know, so it doesn't undo, but just gonna cut it off, and then I will show you one more time with this stitch to fill in the incorrect stitch here.
So this is the stitch that was incorrect. It's not supposed to be white. You can see right here, that's the missing stitch. So we're gonna do the same thing. When you're doing this, just be careful it doesn't show on the front side.
I'm just going through those loops just very lightly on the back. And then we will come up right here at the root, to the very bottom of the V, and then we will slide our needle underneath these two stitches of the stitch above it. And when you do this, try not to pull on the yarn too tightly. If you do that, it distorts your stitches, and it also makes this, right now it can be kind of puffy, 'cause there's a little bit of slack in this yarn, but if you pull it too tight, it's gonna start showing that white underneath. All right, and then you're gonna go back down right here to cover that stitch up, and see, now it looks perfect.
Well, I hope you've enjoyed learning how to work in the split single crochet stitch, and working from a color chart.

How do you finish the edges of the color work after you cut it? Does it come unraveled?
Thanks so much for this! I had been struggling with getting 'clean colorwork' using other techniques. Since this is basically the center single crochet or waistcoat stitch... those are usually easier to execute using a bigger hook than suggested on the yarn band... BUT with colorwork, would you use that same advice (a bigger hook)? Would using a bigger hook (to easily get into the center 'v' or leg of the stitch) distort the colorwork??
would love to learn this, but the video is a bit too far from the camera, when i try to zoom in, it is very distorted :(